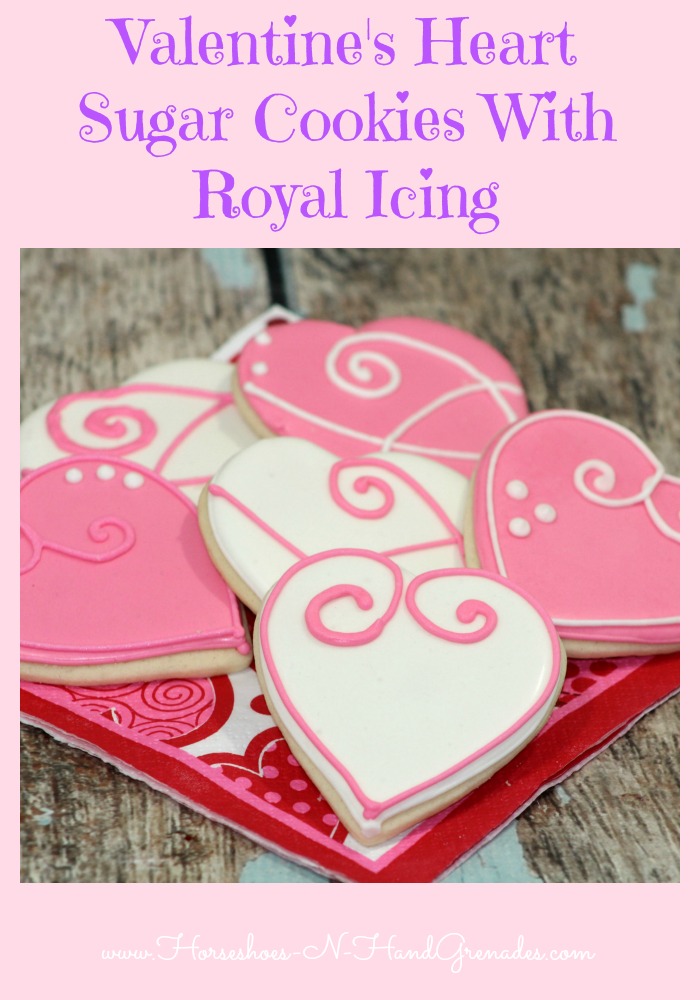
What’s Valentine’s Day without some delicious sweet treats? Pretty boring that’s what! Chocolate, I love it; those little conversation hearts, I may have a sweet spot for those too; but my favorite thing ever? Yup you guessed it! Cookies!!! I especially love a deliciously iced sugar cookie and the designs for Valentine’s Day, well they almost make you feel guilty for eating them…almost. Now I’ll be the first to admit I’m not the best baker in town, but I do try and although these are pretty simple in comparison to some of the stuff that’s out there, I think they’ll do the trick.
Cookie Ingredients
5 C flour
2 tsp baking powder
1 tsp salt
1 1/2 C soft unsalted butter
2 C granulated sugar
4 eggs
Cookie Cutter
Medium size heart cookie cutter
Icing Ingredients
2 egg whites
1 C powder sugar
1/2 tsp cream of tartar
Pink gel food coloring
Cookie Directions
Cream the soft butter with the sugar until the combination is smooth not grainy to the touch in a mixing bowl.
Add all 4 eggs at one time.Continue to mix.
Add the vanilla.Continue mixing.
Sift the four, baking powder, and salt together. Add the dry mixture to the wet mixture.
Continue mixing to make sure all ingredients are thoroughly blended.
Make the dough into a ball, wrap it in cling wrap completely covering the entire dough ball.
Put in the refrigerator for about 6 hours or overnight. Check to see if the dough is firm.
Preheat oven to 325 degrees.
Pull the cookie dough out of the refrigerator and sit it out to soften up a bit.
Put flour out on the cutting board, rub flour on the rolling pin, and (if needed) work some flour into the batter.
Roll the dough out on the cutting board and using the cookie cutter begin to make your cookies.
Line the cookie sheet with parchment paper.
Using a metal spatula move the cut cookies to the parchment lined cookie sheet. Bake for 8 -10 minutes.
Take the cookies off of the cookie sheet and put on a wire rack to cool completely.
Icing Directions
Combine all ingredients in a mixing bowl mixing on medium speed for 4 minutes. (except your food coloring)
If icing is not stiff enough add 1/4 C powder sugar. When this sugar is added stir to mix well.
Divide the icing into two bowls. The first bowl of icing stays white.
The second bowl of icing add several drops of pink food coloring mixing well to make sure the color is blended throughout the entire bowl of icing.
Spoon each color of icing into individual frosting bags with a #5 tips. Twist the open end of the bag to push the icing to the tip.
Outline each of the cookies with the matching colors.
Outline the white iced cookie with the white icing then fill it in. Pink cookie outlined in pink.
Allow this to dry for 30 seconds before filling in the body with the* thinner icing.
* Squeeze the majority of each of the icings into separate bowls then add 1 tsp of water to each of them and mix it in.
Leave a small amount of each of the icing in the frosting bag for use on the cookie for decoration.
Following the designs on the cookies use the opposite color of the bagged icing to add the decoration. I.E. The pink heart outline the cookie in white adding dots and twists.
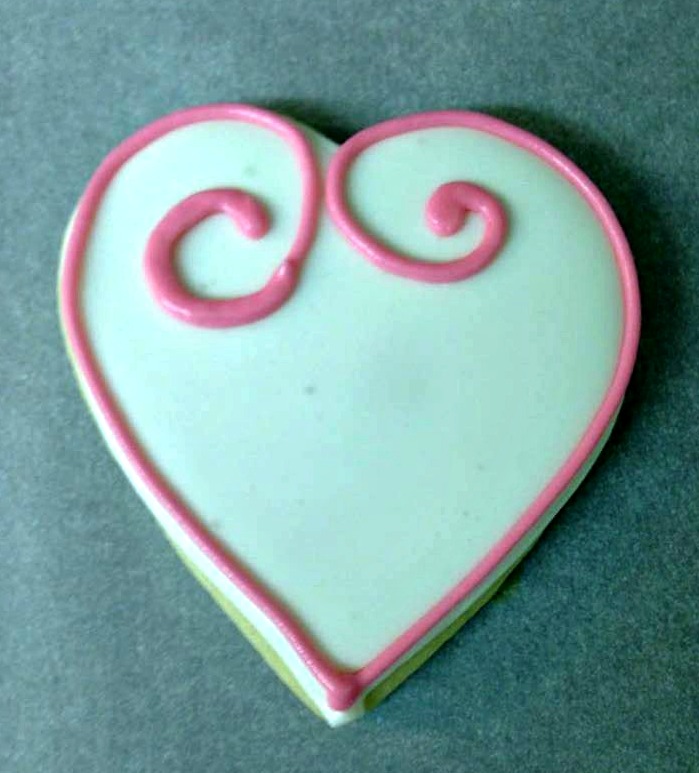
Use your imagination to add decoration to each cookie. Allow for the cookies to dry for 5-10 hours.

- [b]Cookie Ingredients[/b]
- 5 C flour
- 2 tsp baking powder
- 1 tsp salt
- 1 1/2 C soft unsalted butter
- 2 C granulated sugar
- 4 eggs[br]
- [b]Cookie Cutter[/b]
- Medium size heart cookie cutter[br]
- [b]Icing Ingredients[/b]
- 2 egg whites
- 1 C powder sugar
- 1/2 tsp cream of tartar
- Pink gel food coloring
- [b]Cookie Directions[/b]
- Cream the soft butter with the sugar until the combination is smooth not grainy to the touch in a mixing bowl.
- Add all 4 eggs at one time.Continue to mix.
- Add the vanilla.Continue mixing.
- Sift the four, baking powder, and salt together. Add the dry mixture to the wet mixture.
- Continue mixing to make sure all ingredients are thoroughly blended.
- Make the dough into a ball, wrap it in cling wrap completely covering the entire dough ball.
- Put in the refrigerator for about 6 hours or overnight. Check to see if the dough is firm.
- Preheat oven to 325 degrees.
- Pull the cookie dough out of the refrigerator and sit it out to soften up a bit.
- Put flour out on the cutting board, rub flour on the rolling pin, and (if needed) work some flour into the batter.
- Roll the dough out on the cutting board and using the cookie cutter begin to make your cookies.
- Line the cookie sheet with parchment paper.
- Using a metal spatula move the cut cookies to the parchment lined cookie sheet. Bake for 8 -10 minutes.
- Take the cookies off of the cookie sheet and put on a wire rack to cool completely.[br]
- [b]Icing Directions[/b]
- Combine all ingredients in a mixing bowl mixing on medium speed for 4 minutes. (except your food coloring)
- If icing is not stiff enough add 1/4 C powder sugar. When this sugar is added stir to mix well.
- Divide the icing into two bowls. The first bowl of icing stays white.
- The second bowl of icing add several drops of pink food coloring mixing well to make sure the color is blended throughout the entire bowl of icing.
- Spoon each color of icing into individual frosting bags with a #5 tips. Twist the open end of the bag to push the icing to the tip.
- Outline each of the cookies with the matching colors.
- Outline the white iced cookie with the white icing then fill it in. Pink cookie outlined in pink.
- Allow this to dry for 30 seconds before filling in the body with the* thinner icing.
- * Squeeze the majority of each of the icings into separate bowls then add 1 tsp of water to each of them and mix it in.
- Leave a small amount of each of the icing in the frosting bag for use on the cookie for decoration.
- Following the designs on the cookies use the opposite color of the bagged icing to add the decoration. I.E. The pink heart outline the cookie in white adding dots and twists.
- Use your imagination to add decoration to each cookie. Allow for the cookies to dry for 5-10 hours.


 Stacie @ Divine Lifestyle says
February 5, 2016 at 9:44 amThose cookies are gorgeous! They look more like decorations than snacks. Great job!
 Emerald says
February 5, 2016 at 9:57 amWhat gorgeous cookies. They sound tasty, and they look like something you’d get in a fancy gift basket.
 Jeanette says
February 5, 2016 at 10:28 amThose look gorgeous!! There are many things that I am talented that this is not one of them. Can I hire you to make mine? LOL.
 Cara (@StylishGeek) says
February 5, 2016 at 3:10 pmLove this recipe! My kid was just looking for something to make this V-day so I’ll definitely share this Valentine’s Heart Sugar Cookies With Royal Icing recipe with her!
 travel blogger says
February 5, 2016 at 6:34 pmYummy! These look so good! I need to start making my Valentine’s Day cookies. I am totally going to try these.
 Rebecca B. says
February 6, 2016 at 5:58 amThose are such gorgeous cookies!! I am sure that they taste even better than they look 🙂
 Miles L. says
February 6, 2016 at 6:32 amThese look cute and adorable. I love heart-shaped cookies. I will definitely try this one. Thanks for this!
 Katie says
February 6, 2016 at 6:36 amWhat pretty cookies! You are really talented with the frosting part of the decoration. It looks like something you’d see in a bakery!
 OurFamilyWorld says
February 6, 2016 at 6:09 pmThose are cute cookies. I want to make some for the grils.
 Kelli @ 3 Boys and a Dog says
February 6, 2016 at 6:32 pmThose look so great! And the icing looks like as if it were done by a professional. If only mine would come out that great! Thank you for sharing this recipe, cookie recipes never go out of style in our house!
 Up Run for Life Fitness and Health says
February 6, 2016 at 8:14 pmThese are beautiful cookies. I need to learn how to make pretty cookies.I hope they are a hit at the Valentine’s day party.
 Sarh S says
February 7, 2016 at 11:01 amThose are so cute! I know mine would not turn out that well.
 Bonnie @wemake7 says
February 7, 2016 at 1:12 pmThose are wicked cute. I would love to make these for Valentine’s Day.
 1stopmom says
February 7, 2016 at 3:54 pmThese cooks look delicious! One of these days I am going to try to make some of these.
 rika says
February 7, 2016 at 4:44 pmWhat a perfect recipe for Valentine’s Day. I love baking sugar cookies
 HilLesha says
February 7, 2016 at 4:49 pmI normally don’t get into sugar cookies, but those are super cute! I may have bake something like this for my children for Valentine’s Day.
 Tracy @ Ascending Butterfly says
February 7, 2016 at 8:33 pmThose Iced Sugar Cookies are super pretty! Thanks for sharing the recipe! 🙂
 Michelle says
February 7, 2016 at 9:26 pmThese are so chic looking. I need to try these, we homeschool so my kids miss out on the fun party stuff.
 Ann Bacciaglia says
February 7, 2016 at 9:50 pmThese look amazing. I will have to get the ingredients so i can make this recipe on the weekend. I hope mine turn out as nice as yours did.
 Kiwi says
February 8, 2016 at 1:13 amI love the decor of these cookies! I want to learn how to really master making royal icing cookies because its so pretty…one day!
 Lisa Rios says
February 9, 2016 at 4:42 amI am just loving these cute looking cookies with simple yet beautiful colors. I can see it is a lot of work that needs patience, but the end result is mind blowing. My kids would love it right away.